Trending
Call of Duty: Modern Warfare 4 is the next title in the Call of Duty series. Developed by Infinity Ward, the new title takes the reboot Modern Warfare 4 series to a conclusion as Task Force 141 ties up all loose ends.
Alongside new gameplay mechanics, weapons, maps, and modes, Inifnity Ward has also made drastic changes to their RICOCHET anti-cheat. With the release of Call of Duty: Modern Warfare 4, players must enable TPM 2.0 and Secure Boot to play the game on PC, which also includes the upcoming beta of the game. Here's an in-depth guide on how to enable secure boot for Call of Duty: Modern Warfare 4.

Why are TPM 2.0 and Secure Boot Required for Call of Duty: Modern Warfare 4?
On PC, the Modern Warfare 4 Beta will require TPM 2.0 and Secure Boot. Together with Call of Duty's upgraded RICOCHET Anti-Cheat detection systems, these features strengthen machine integrity, improve detections, and create a more secure environment that catches more cheating.
When Call of Duty: Modern Warfare 4 launches on October 23, 2026, these requirements will combine with the newest RICOCHET Anti-Cheat upgrades. At that point, Infinity Ward will introduce a remote verification system to provide the strongest safeguard possible.
Here's how to enable TPM 2.0:
First, we need to verify if TPM 2.0 is enabled on your PC and then check if your system supports TPM 2.0 or not. Here's a step-by-step guide on how to do it:
- Press the Windows key + R to open the Run dialogue box.
- Type tpm.msc and press Enter.
- If TPM 2.0 is enabled, you’ll see “The TPM is ready for use” under the Status section.
- If you see “Compatible TPM cannot be found”, TPM may be disabled in your BIOS, or your system may not support it.
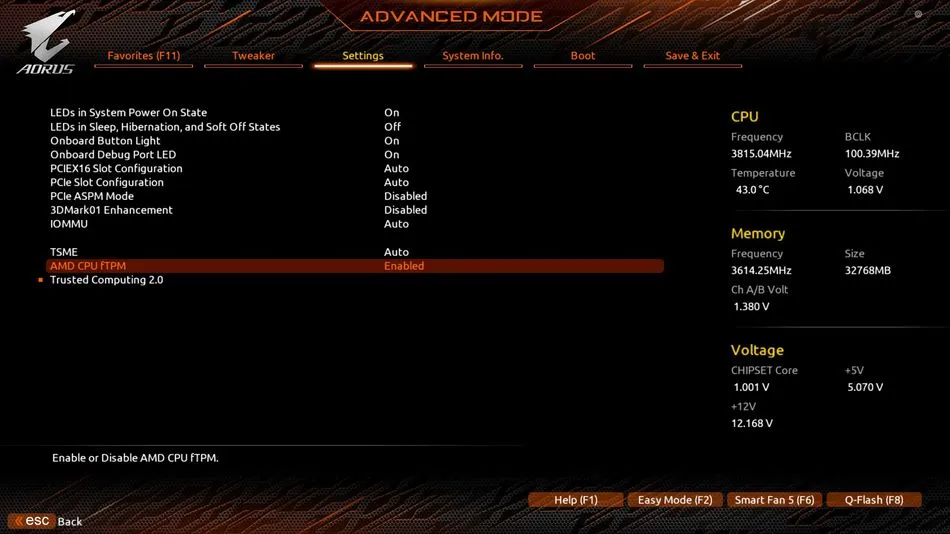
Here's how you can enable TPM 2.0:
- Restart your PC and enter the BIOS. You can usually do this by pressing Delete, F2, or Esc during startup.
- Look for the Settings tab in your BIOS menu.
- Find TPM (Intel PTT or AMD CPU fTPM) and enable it.
- Save and exit BIOS (usually F10).
TPM 2.0 is available for Windows 10 but is required for Windows 11, so enabling both features ensures your system is ready for future updates and secure Call of Duty
Here’s how to enable Secure Boot:
Before we actually start with the process, we'll need to check if your PC is set up correctly for the Secure Boot feature. In the Windows search bar, enter "Run" and start the program, then in the Open field, enter msinfo32 and hit "OK".
Under BIOS Mode, it should say "UEFI", and there's also a Secure Boot State field, which should tell you if Secure Boot is ON, OFF or not supported. If it says OFF, follow the instructions below to enable Secure Boot.
- Restart your PC and enter the BIOS. You can usually do this by pressing Delete, F2, or Esc during startup.
- Look for the Boot or Security tab in your BIOS menu.
- Find Secure Boot and enable it.
- If Secure Boot is greyed out, check if UEFI Boot Mode is enabled. You may need to disable Legacy Boot/CSM first.
- Save and exit BIOS (usually F10).
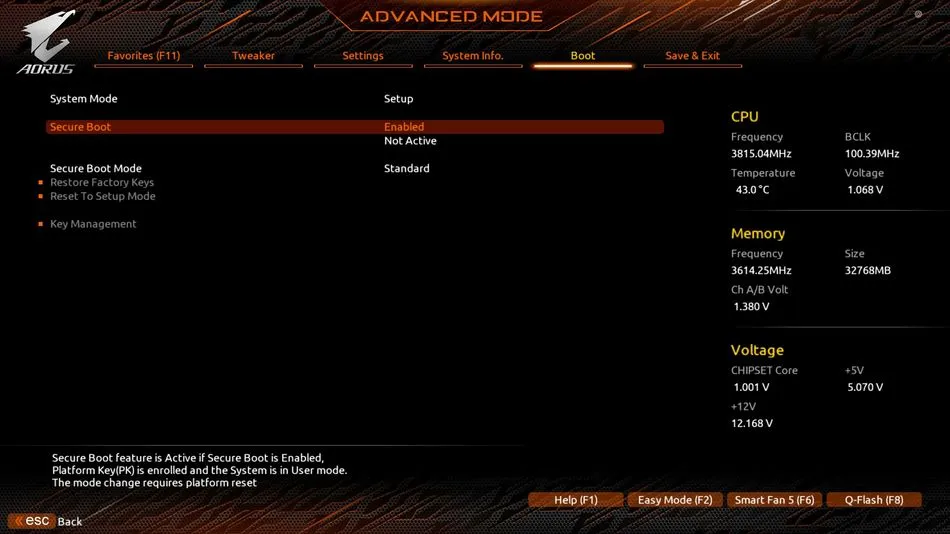
If your system drive is set up using MBR instead of GPT, Secure Boot might not work. You’ll need to convert it to GPT using Windows Disc Management or third-party tools.
Make sure Windows is installed in UEFI mode, not Legacy. Some motherboard manufacturers, like Gigabyte for example, may also require you to Restore Factory Keys to enable Secure Boot. You'll find these settings under the Secure Boot tab in BIOS.
Once both of them are enabled, reboot your PC and try launching Call of Duty: Black Ops 7 again. The error should be gone, and you’re ready to drop into the fight. If you're still struggling to enable Secure Boot, check the instructions from Activision Support to guide you through the complex process.
However, if you’re unfamiliar with your PC’s UEFI/BIOS or unsure how to make changes, we strongly recommend contacting a professional and/or your PC or motherboard manufacturer for step-by-step guidance.

DON'T MISS: