PC users often prefer having speakers and headphones work at the same time in order to avoid disabling one device whenever they need to switch. This becomes problematic in some situations since controls are not always intuitive when attempting to make both the devices connected to the front and back 3.5mm jack panels produce the sound.
Anyway, Realtek Audio Manager, which is used with motherboards that support either Intel or AMD CPUs is the popular choice so this is the one where we will show you how to enable both panels at the same time.
Step one - Open Realtek Audio Manager
Just click start, type "Realtek" and the OS will offer the app at the top of the list. Click it.
Step two - Advanced settings menu
You will find this menu in the top right corner of the UI. For some motherboards, it is a gear icon next to minimize, maximize and close icons. On other mobos, the UI might show this menu as "Device Advanced settings" underneath minimize, maximize and close icons. Click on the menu when you find it.
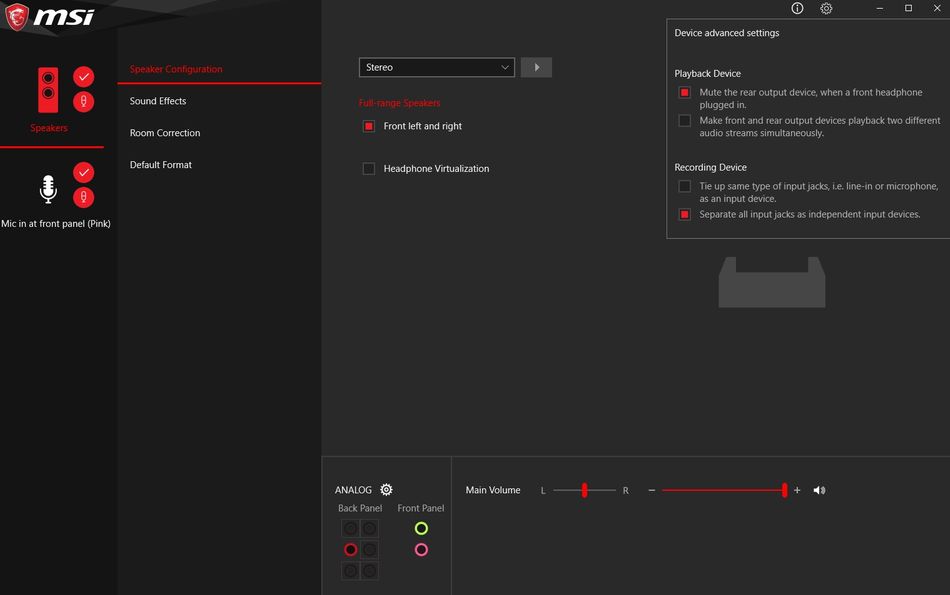
You will see two sections in the Advanced settings menu - Playback Device and Recording Device.
Under the Playback Device, you will have two options:
- Mute the rear output device, when a front headphone is plugged in
- Make front and rear output devices playback two different audio streams simultaneously
Check only the "Mute the rear output device" option.
Under the Recording Device, you will have two other options:
- Tie up the same type of input jacks, i.e. line-in or microphone, as an input device
- Separate all input jacks as independent input devices
Select only the "Separate all input jacks" option and move on to Analog menus.
Step three - Analog settings menu
You will find Analog settings menu on the bottom side of the interface in some cases while in others, it will be a folder icon close to the right edge of the UI.
Click it and you will get the following options under Connector Settings:
- Disable front panel popup dialog
- Enable jack detection when device is plugged in
Check only "Disable front panel popup dialog" option.

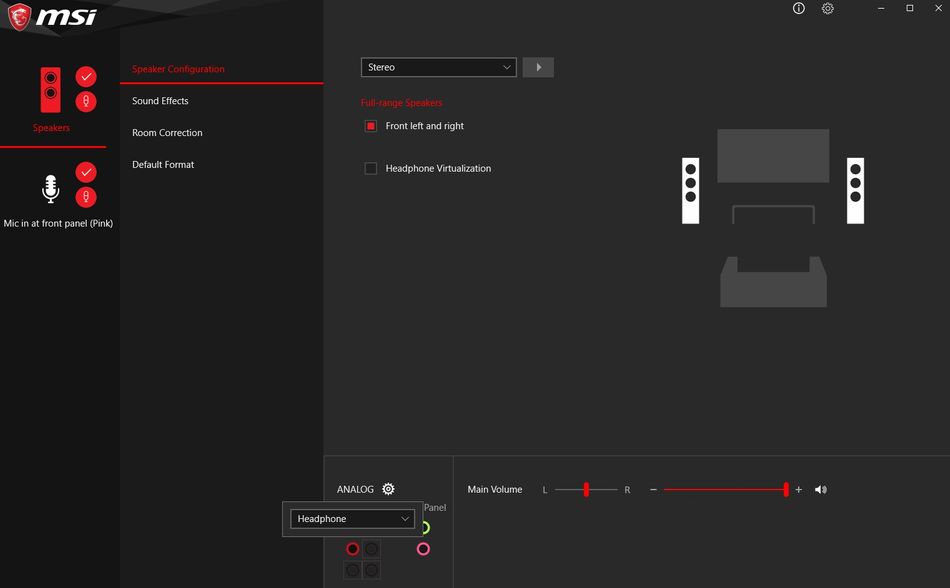
After you're done with that, you will see icons resembling 3.5mm jack connectors, close to where you found the Connector Settings. Click the connectors that resemble the ones where you plug the speaker or headphones, for front and back panels. Don't touch the microphone connector. In the images in this guide, the correct connectors are the red one for the back panel and the green one for the front.
On both of those connectors, you will get a drop-down menu with numerous options but choose "Headphone" for both of them.
Step four - Test your sound
By the time you are done, you should only see the microphone and one of the output devices (headphones or speakers) as available on the left side. Click any of the speaker icons around the monitor in the UI to test if it works.
After that, your headphones and speakers should be enabled at the same time and you don't need to disable them in any way other than powering them off as you desire.